If you’ve ever followed a recipe exactly and still ended up with dry cookies, dense cake, or runny batter, there’s a good chance the issue started with how the ingredients were measured. Baking, especially, is less forgiving than cooking, and even a little too much flour or not enough liquid can completely change the final result.
The good news is that learning a few simple measuring techniques can instantly improve your cooking and baking. Whether you’re scooping flour, pouring milk, or trying to halve a recipe without pulling out a calculator, these small kitchen basics make a big difference.
Understanding the Different Types of Measuring Cups
One of the biggest kitchen mistakes beginners make is using the wrong type of measuring cup. Dry and liquid measuring cups are designed differently, and using the wrong one can throw off an entire recipe.
Dry Measuring Cups
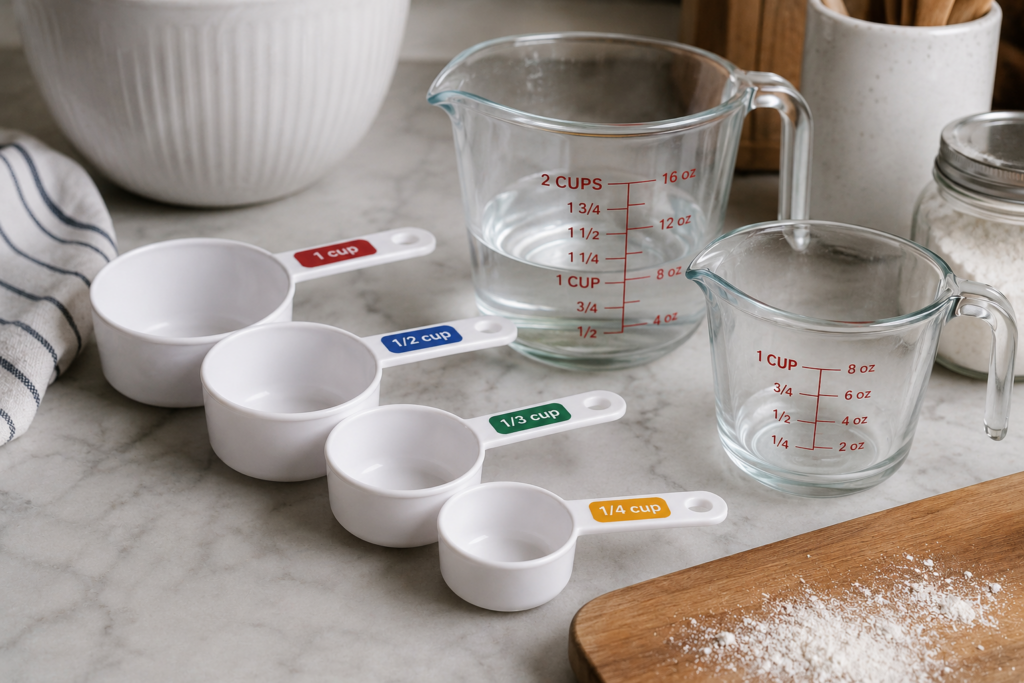
The plastic or metal measuring cups that come as separate individual sizes are meant for dry ingredients. These usually include:
- 1 cup
- 1/2 cup
- 1/3 cup
- 1/4 cup
Dry measuring cups are designed to be filled all the way to the top and then leveled off with a knife.
These are best used for:
- Flour
- Sugar
- Brown sugar
- Oats
- Cocoa powder
- Chocolate chips
For dry ingredients, accuracy matters most when the ingredient can be packed down or compressed.
Liquid Measuring Cups
The measuring cups with multiple measurement lines printed on the side are designed for liquids. These typically come in:
- 1 cup sizes
- 2 cup sizes
- 4 cup sizes
They also usually have a handle and pour spout.
Liquid measuring cups leave extra room at the top so liquids don’t spill while carrying them. They also allow you to view the measurement line at eye level for better accuracy.
These are best used for:
- Water
- Milk
- Oil
- Melted butter
- Heavy cream
- Broth
Using a dry measuring cup for liquids often leads to spills and inaccurate measurements, while using liquid measuring cups for flour or sugar can make it difficult to level ingredients properly.
How to Properly Measure Dry Ingredients
Dry ingredients should be measured differently than liquids. Scooping incorrectly can add far more ingredient than the recipe intended.
Flour
Flour is one of the most commonly over-measured ingredients in baking. Scooping the measuring cup directly into the flour bag packs the flour down, which can leave you with dense muffins, dry cakes, or heavy biscuits.
Instead:
- Fluff the flour with a spoon first
- Spoon the flour into the measuring cup
- Level the top with the flat edge of a knife
Do not tap or shake the cup to fit more flour inside.
Brown Sugar
Most recipes calling for brown sugar mean packed brown sugar unless otherwise stated. Press the sugar firmly into the measuring cup so it holds its shape when turned out.
Powdered Sugar
Powdered sugar tends to clump. For smoother frosting and more accurate baking measurements, sift it before measuring if the recipe recommends it.
How to Properly Measure Wet Ingredients
Liquid ingredients should always be measured in liquid measuring cups.
To measure liquids correctly:
- Set the measuring cup on a flat surface
- Bend down so your eyes are level with the measurement line
- Pour slowly until the liquid reaches the correct mark
This method helps prevent accidentally adding too much milk, oil, or water.
Sticky ingredients like honey or syrup pour easier if you lightly spray the measuring cup with cooking spray first.
Easy Measurement Swaps When Cutting Recipes in Half
Halving recipes sounds simple until you run into measurements that are awkward to divide. One of the easiest kitchen tricks to remember is:
- 1/4 cup = 4 tablespoons
So if you’re making half a recipe and it calls for 1/4 cup of an ingredient, you can simply use:
- 2 tablespoons instead
This works for both wet and dry ingredients.
Here are a few more useful kitchen conversions to memorize:
| Original Measurement | Equal To |
|---|---|
| 1 tablespoon | 3 teaspoons |
| 1/4 cup | 4 tablespoons |
| 1/3 cup | 5 tablespoons + 1 teaspoon |
| 1/2 cup | 8 tablespoons |
| 1 cup | 16 tablespoons |
Knowing these conversions makes scaling recipes much easier, especially when cooking smaller portions at home.
Why Many Bakers Prefer Measuring in Grams
Professional bakers often use a kitchen scale because grams are more accurate than measuring cups. One person’s “cup of flour” can be very different from another person’s depending on how tightly the flour was packed.
Using grams creates more consistent baking results every time.
Here are some common pantry ingredient measurements in grams:
| Ingredient | 1 Cup in Grams |
|---|---|
| All-purpose flour | 120 grams |
| Bread flour | 127 grams |
| Granulated sugar | 200 grams |
| Brown sugar (packed) | 220 grams |
| Powdered sugar | 120 grams |
| Butter | 227 grams |
| Rolled oats | 90 grams |
| Cocoa powder | 85 grams |
| Chocolate chips | 170 grams |
| Honey | 340 grams |
| Peanut butter | 255 grams |
| Rice | 185 grams |
These numbers can vary slightly between brands, but they’re reliable starting points for most home recipes.
Small Measuring Habits Make a Big Difference
Learning how to measure ingredients properly may seem minor, but it’s one of the biggest differences between recipes that turn out “just okay” and recipes that turn out consistently great. Proper measuring improves texture, flavor, baking consistency, and even cooking times.
Once you get comfortable using correct measuring techniques — and maybe even a kitchen scale — you’ll likely notice your homemade recipes start turning out much closer to what you hoped for the first time around.